What is an Autoencoder?
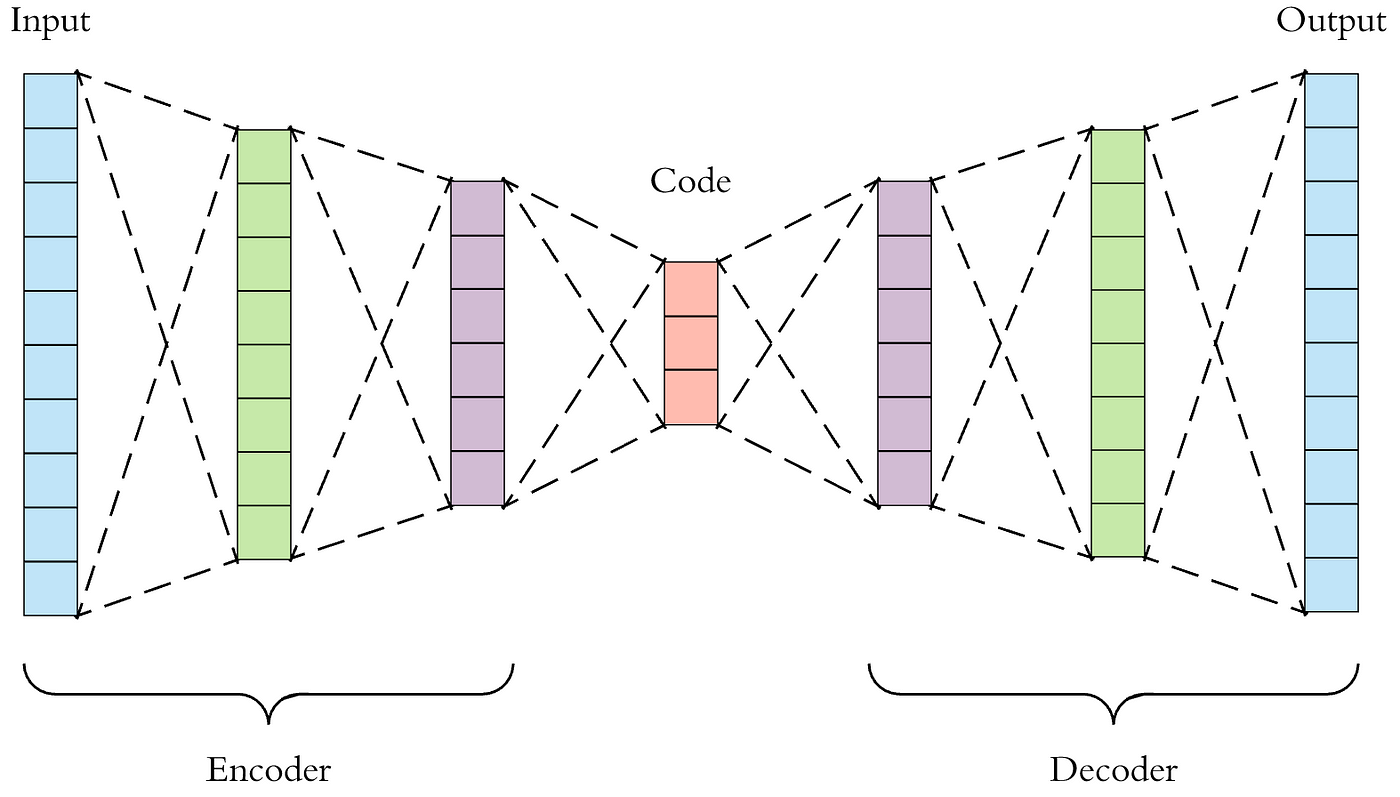
An Autoencoder is a type of artificial neural network used to learn efficient codings of data. The aim is to learn a representation (encoding) for a set of data, typically for the purpose of dimensionality reduction. The network consists of two main parts:
- Encoder: This part compresses the input data into a latent-space representation (a smaller dimensional space).
- Decoder: This part reconstructs the input data from the compressed latent-space representation.
Autoencoders are trained to minimize the difference between the input and output, which encourages the model to learn an efficient representation of the data. Because autoencoders are unsupervised, they don't require labeled data.
Anomaly Detection using Autoencoder
Anomaly detection involves identifying data points that don't fit the expected pattern. In the context of autoencoders, anomalies are identified based on the reconstruction error. If the reconstruction error (the difference between the input and the output) is higher than a certain threshold, the data point is considered an anomaly.
Python Code for Anomaly Detection using Autoencoder
Here’s how you can implement a simple autoencoder for anomaly detection:
import numpy as np
import pandas as pd
from tensorflow.keras.models import Model
from tensorflow.keras.layers import Input, Dense
from sklearn.preprocessing import MinMaxScaler
from sklearn.model_selection import train_test_split
from sklearn.metrics import mean_squared_error
import matplotlib.pyplot as plt
# Step 1: Generate synthetic data
data = np.random.normal(0, 1, (1000, 20))
# Introduce anomalies
anomalies = np.random.normal(0, 5, (50, 20))
data_with_anomalies = np.vstack([data, anomalies])
# Step 2: Normalize the data
scaler = MinMaxScaler()
data_scaled = scaler.fit_transform(data_with_anomalies)
# Step 3: Split the data into training and testing sets
X_train, X_test = train_test_split(data_scaled, test_size=0.2, random_state=42)
# Step 4: Build the Autoencoder Model
input_layer = Input(shape=(X_train.shape[1],))
# Encoder
encoded = Dense(16, activation='relu')(input_layer)
encoded = Dense(8, activation='relu')(encoded)
encoded = Dense(4, activation='relu')(encoded)
# Decoder
decoded = Dense(8, activation='relu')(encoded)
decoded = Dense(16, activation='relu')(decoded)
decoded = Dense(X_train.shape[1], activation='sigmoid')(decoded)
# Autoencoder Model
autoencoder = Model(inputs=input_layer, outputs=decoded)
autoencoder.compile(optimizer='adam', loss='mse')
# Step 5: Train the Autoencoder
history = autoencoder.fit(X_train, X_train,
epochs=50,
batch_size=32,
validation_split=0.1,
shuffle=True)
# Step 6: Predict and Evaluate Anomalies
X_test_pred = autoencoder.predict(X_test)
# Calculate the Mean Squared Error (MSE)
mse = mean_squared_error(X_test, X_test_pred, multioutput='raw_values')
# Define a threshold for anomaly detection
threshold = np.percentile(mse, 95)
# Identify anomalies
anomalies = mse > threshold
print(f"Number of anomalies detected: {np.sum(anomalies)}")
# Step 7: Visualize Results
plt.figure(figsize=(10, 5))
# Plot the loss over epochs
plt.subplot(1, 2, 1)
plt.plot(history.history['loss'], label='Training Loss')
plt.plot(history.history['val_loss'], label='Validation Loss')
plt.legend()
plt.title('Training and Validation Loss')
# Plot MSE histogram
plt.subplot(1, 2, 2)
plt.hist(mse, bins=50)
plt.axvline(threshold, color='red', linestyle='--')
plt.title('MSE Histogram with Threshold')
plt.show()
Explanation:
Data Generation: Synthetic data is generated with normal distribution. Some anomalies are introduced with higher variance.
Data Normalization: The data is normalized using
MinMaxScaler.Autoencoder Model: The autoencoder is built with a three-layer encoder and decoder. The model is compiled using the Adam optimizer and MSE loss.
Training: The autoencoder is trained to reconstruct the input data.
Anomaly Detection: After training, the model's reconstruction error is calculated for the test set. A threshold is set (95th percentile), and data points with higher errors are flagged as anomalies.
Visualization: Loss curves and MSE histogram are plotted to visualize the training process and the threshold for anomaly detection.
No comments:
Post a Comment